前言
使用这种方式安装openwrt,更新固件方便。此外,可以安装docker版samba,做nas共享移动硬盘。
准备工作
- 已经刷入Armbian的n1一台
- 获取阿里云镜像加速地址
1.登陆 dev.aliyun.com 2.管理控制台->镜像库->镜像加速器->加速器 3.复制加速器地址
1. 安装docker
- 调用阿里云的镜像
1 | |
- 等待安装完成
- 逐行执行如下命令
1 | |
2. 安装docker图形化管理
01 安装
- 创建卷
1 | |
- 运行如下命令,等待安装完成
1 | |
2
3
4
5
6-d:后台运行 -p 9000:9000 # 宿主机 9000 端口映射容器的 9000 端口 --restart always # 开机自启 -v /var/run/docker.sock:/var/run/docker.sock: # 把宿主机的 Docker 守护进程 (Docker daemon) 默认监听的 Unix 域套接字挂载到容器中。 -v Portainer_data:/data: # 把宿主机 Portainer_data 数据卷挂载到容器 /data 目录
02 进入webui
1 | |
- 创建用户,用户名和密码
1 | |
- 选择local
- 点击[connect]
- 点击【loacl up】→点击[Dashboard]
此时看到右方的containers有容器,表示部署成功。
以后若要完整卸载某容器,先就勾选中容器,然后点remover,然后在image删除对应的镜像,若还有容器对应的volume,也要删除。
3. 安装Docker版openwrt
01 拉取op镜像
- 拉取openwrt镜像
1 | |
mix70周年
kanshudj/n1-openwrtgateway:r9.10.1flippy大神的镜像
unifreq/openwrt-aarch64:r9.12.03手动导入镜像,
openwrt-armvirt-64-default-rootfs.tar.gz为镜像名
2docker import openwrt-armvirt-64-default-rootfs.tar.gz openwrt:R9.10.1
- 开启网卡的混合模式
1 | |
1 | |
- 创建 macvlan 网络:新建好一个与主路由网段一样的给旁路由用的网络
1 | |
2
3
4
5
6
7
8
9
10
11
12
13
14
15
16
17
18
19docker network create\ -d macvlan\ --subnet=192.168.2.0/24\ --gateway=192.168.2.1 -o\ parent=eth0 macvlan_lan # 解释: # 从宿主机的 eth0 网卡虚拟出多个子网卡接口,并且子网段是 192.168.2.0/24,网关是 192.168.2.1 的 macvlan 网络,名字叫 macvlan_lan。 一个 eth0 只能创建一个 macvlan 网络,但也有其它办法多开。 参数: -d macvlan # 创建类型为 macvlan 网络模式。 --subnet # 创建大池网段,指定容器获取网段范围。 --ip-range # 创建小池网段,指定容器获取网段范围。 --gateway # 网关,继承宿主机所在网关(主路由 IP )。 -o parent=eth0 # 解释:-o -> option / parent=eth0 -> macvlan 继承的物理接口。 -o macvlan_mode bridge # macvlan 模式,默认就是 bridge。 macvlan_lan # 自定义该 macvlan 名字。查看 macvlan 是否创建成功
2
3
4
5
6# 查看命令 docker network ls # 查看 docker 网桥详细 docker network inspect <name>
- 创建 OpenWrt 容器
1 | |
2docker run --restart always -d --network macnet --privileged openwrt:R9.10.1 /sbin/init
2
3
4
5
6
7
8
9
10
11
12
13
14
15
16
17
18# 运行 docker run -d\ --name=OpenWrt\ --restart always\ --privileged\ --network macvlan_lan\ --ip 192.168.2.100\ unifreq/openwrt-aarch64:r9.11.23 #kanshudj/n1-openwrtgateway:r9.10.1 # 运行参数: -d # 后台运行 --name # 设定该容器名字 --restart always # 自启 --privileged # 容器提权 --network # 指定哪个 macvlan 网络,这里是 macvlan_lan --ip # 指定 ip 运行 --ip 192.168.2.100
02 配置 Openwrt (方法一)
- 查看镜像
1 | |
- 进入镜像
1 | |
‘container id’ 是一串数字
- 编辑网络
1 |
|
- 输入i进入编辑,同样将x改为你主路由的网段
1 |
|
2
3
4
5
6
7
8
9
10
11
12
13
14
15
16
17
18
19
20
21
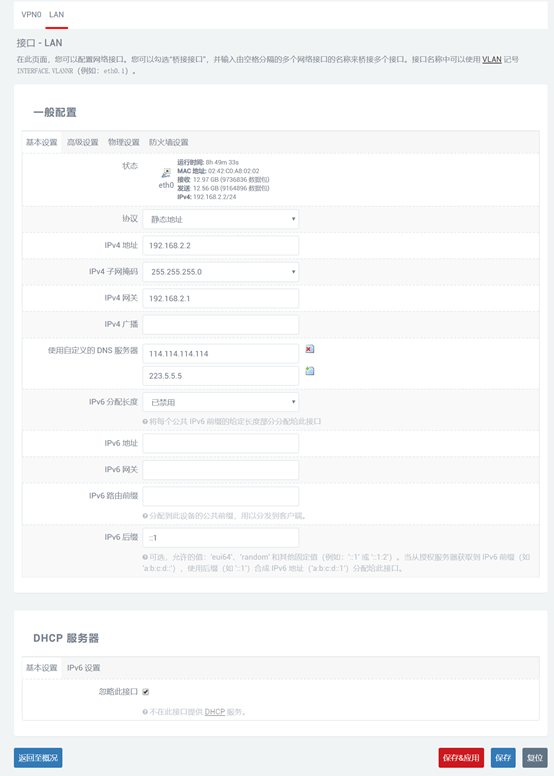
22config interface 'loopback' option ifname 'lo' option proto 'static' option ipaddr '127.0.0.1' option netmask '255.0.0.0' config globals 'globals' option ula_prefix 'fd2f:ea21:0e02::/48' config interface 'lan' option type 'bridge' option ifname 'eth0' option proto 'static' option ipaddr '192.168.2.2' option netmask '255.255.255.0' option gateway '192.168.2.1' option dns '114.114.114.114 223.5.5.5' config interface 'vpn0' option ifname 'tun0' option proto 'none'
- 按
Esc,输入:wq!保存并退出编辑 - 重启网络
1 |
|
- 退出docker
1 |
|
- 重启
1 |
|
02 配置 Openwrt (方法二)
chrome进入vi可能存在问题,可以换edge浏览器解决。
- 登入docker图形管理界面
1 | |
- 点[container]
- 选择刚导入的镜像→ 点击
>_→ 点击 [Connect]

- 按i改网关信息
1 |
|
- 找到3处包含192.168.X.X的地方,输入i进入编辑,同样将x改为你主路由的网段
1 |
|
2
3
4
5
6
7
8
9
10
11
12
13
14
15
16
17
18
19
20
21
22
23config interface 'loopback' option ifname 'lo' option proto 'static' option ipaddr '127.0.0.1' option netmask '255.0.0.0' config globals 'globals' option ula_prefix 'fddd:594f:f602::/48' config interface 'lan' option type 'bridge' option ifname 'eth0' option proto 'static' option ipaddr '192.168.2.3' option netmask '255.255.255.0' option ip6assign '60' option gateway '192.168.2.1' option dns '114.114.114.114 223.5.5.5' config interface 'vpn0' option ifname 'tun0' option proto 'none'
- 按
Esc,输入:wq!保存并退出编辑 - 重启网络
1 |
|
重启网络也可以用这种方法:
- 点击 [disconnect]
- 在 containers处:勾选op→点击 [restart]
- 退出openwrt shell
1 |
|
- 等一会浏览器中输入1.2.168.2.2 即可进入op
03 登入openwrt
- 浏览器输入
192.168.2.2即可进入openwrt
用户名 root
密码 password
①添加防火墙规则
1 | |
②旁路由设置
n1只负责网关
1 | |
- 主路由不做任何更改
需要科学上网的设备:ip自定义+dns和网关设为192.168.2.2,网段前缀24
4. 设置Armbian静态ip和DNS
目的
- 改静态ip是为了在安装docker的op下,能登录armbian的ssh
- 改DNS是为了让armbian正常解析域名
01 网关和DNS由docker版op负责(方法一)
网关和DNS由docker版op负责,使armbian和docker网络互通
- moba登入n1
- 下载
/etc/network下的interfaces文件 - 用记事本打开interfaces文件,修改3处地方
1 | |
- 保存→上传替换
此时没有提示,会直接覆盖。
- 重启
1 |
|
01 网关和DNS由主路由负责(方法二)
1 | |
02 查看网关和DNS
此时,网关和DNS由主路由负责
- 查看DNS
1 | |
- 执行如下命令,有响应即表示修改成功
1 | |